2013年8月25日 星期日

Phalacrognathus muelleri (Rainbow stag beetle)

I bought four P. muelleri L3 larvae on October 16th 2010 .

The weight of the larvae was 3 grams , 6 grams , 6 grams and 7 grams .

I had fermented some decayed wood flakes before buying them , so i employed the wood flakes to feed them .

The larvae were put in plastic containers , the volume of the containers is about 1 liter .

Through the transparent containers i could observe the larvae clearly .

2010-11-19 , i found that the larvae consumed the wood flakes very fast , so i decided to change the wood flakes .

2010-11-20 , i changed the wood flakes and weighed the larvae at the same time , their weight was 11 gram , 13 grams , 9 grams and 13 grams respectively .

At that time ,  the larve had started to store fat , the fat inside their bodies was white in the beginning , as time goes on , much fat would be stored in their bodies , when they approached to build pupal cells , they were opaque and yellow in color , signifying that they achieved maximum weight , at that moment , the weight would not increase quickly .  

2010-12-11 , One of the larvae was dead , the weight of the rest larvae was 14 gram , 16 gram , X , 16 gram .

2011-1-21 , Their weight was 16 grams , 18 grams and 19 grams .

2011-2-28 , i discovered a pre-pupa .

2011-3-16 , the individual became a pupa .

2011-3-19 , i discovered the second pupa .

2011-3-21 , the last larva was in the pre-pupal period .

2011-3-23 , the last individual had pupated .

The larvae were males , their pupae all had obvious mandibles .

The first pupa turned into an adult on April 16th 2011 , i let him stay in the original pupal cell , because the conditions of the cell was well .

Another two pupae had been taken out of the pupal cells , i put them in artificial cells , finally , they turned into the adults on April 21st 2011 and April 23rd 2011 respectively .

This time , i had used fermented decayed wood flakes to raise the larvae at the room temperature , i found that the wood flakes decayed quickly when the rearing temperature was high , once the rearing humidity was also high , the wood flakes would become dirt quickly .

In order to prevent the condition , i would decrease the rearing humidity or keep the containers in cool places .

In Taiwan , the beetle breeders usually use  kinshi bottles to raise rainbow stag beetles and have gained many good efforts .

Once choosing kinshi bottles to rear P. muelleri larvae , the temperature control is necessary , because the temperature inside the bottle was higher than the room temperature , when the fungi decompose the lignin , the temperature would rise within 1 ~ 5 degrees Celsius .        

P. muelleri larvae and adults all have amazing look , i personally suggest you to experience the species in person .

Related pictures :      

The larva ate the wood flakes alone with his excrement pellets 

 P. muelleri L3 larva , 9 grams , 2010-11-20

P. muelleri L3 larva , 13 grams , 2010-11-20

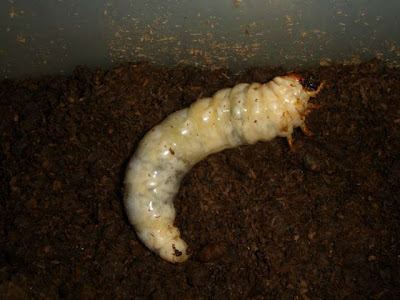
The larva started to store fat , 2010-11-20

P. muelleri old L3 larva , 18 grams , 2011-1-21

P. muelleri old L3 larva , 19 grams , 2011-1-21

P. muelleri old L3 larva , 16 grams , 2011-1-21

P. muelleri pre-pupa , 2011-2-28

P. muelleri male pupa , 2011-3-16 

P. muelleri pre-pupa , it would pupate in two days later , 2011-3-21

Above individual had pupated , 2011-3-23 

P. muelleri male pupa

It was time to start eclosion

Starting to spin his body , 2011-4-16

To dry out his inner wings


Starting to stretch his mandibles

The eclosion was over  

Another individual :


2013年8月22日 星期四

Making kinshi bottles from fungi bags

In Taiwan , beetle breeders use kinshi bottles , fungi bags and fungi bricks to feed stag beetles and even rhinoceros beetles .

The contents of the three products all consist of wood flakes and fungi mycelium , the major difference of them is the volumes , other differences such as fungi species , wood kinds , additives , humidity and grain sizes may be caused by different brands and manufacturers .

In general , kinshi bottles have higher decayed degrees than fermented wood flakes , but it is not always like this , if i want it to come true , i must check something first .

In my experiences , kinshi bottles will undergo three different stages in their lifespan .

The three stages all relate to a kinshi bottle's wood flakes and mycelium status .

At the 1st stage , the fungi mycelium have not spread to all the wood flakes inside the bottle , so the kinshi bottle is not full white in color .

At this moment , the wood flakes is dark brown and hard in texture .

At the 2nd stage , the fungi mycelium colonize all the wood flakes inside the bottle , as time goes on , the decayed degree of the wood flakes will be rise gradually .

Finally , the color of the wood flakes will be changed from dark brown to pale yellow , signifying that the kinshi bottle is suitable to be used to rear larvae .

At the 3rd stage , the fungi mycelium are rotten , i can't see filaments anymore .

At this moment , the texture of the wood flakes is soft and similar to dirt .

Using the 1st or 3rd stage kinshi bottles to rear larvae is always failed , eventually , the larvae will become minor adults or die in the bottle .

For me , the manufacture date of a kinshi bottle is the most important thing which i can use to estimate that the kinshi bottle is or not worth to buy .

If the boss does not know the manufacture date either , i will try to identify that the kinshi bottle stays in which stage . Or to buy the non full white kinshi bottles as the spare .

Once the mycelium spread to all the wood flakes inside the bottle , they still need time to decompose the lignins , so i will wait for a while before using the bottle .

I prefer to use fungi bags rather than kinshi bottles , because fungi bags allow me to adjust something about rearing , if i don't want to do that , i can use the fungi bags directly .

When using fungi bags or fungi bricks , i usually tend to remake them , thus , i can put something to aid the fungi growing well and portion out the fungi lump in the prepared jars .

Besides , the water distribution of the fungi lump also can be averaged by crushing the lump and stirring the wood flakes before topping up the jars .

If the fungi bags are fresh , the mycelium will be strong and not afraid molds to compete with them , finally , all the jars will be white in a few days .

In order to ensure the successful ratio , i will disinfect my hands and tools with alcohol before touching the fungi bags , then , placing the finished jars in somewhere at 20 ~ 25 degrees Celsius . (The most of molds like the environment which is warm and moist .)

Notice that fungi growth needs oxygen especially in the expanded period , so i prefer to poke some ventilation holes on the lids and cover the jars incompletely .

For fermented wood flakes , the dark brown color means that it has higher decayed degree , that completely different from kinshi bottles , so i must choose the right substrate with the right decayed degree to rear the right larvae .

Related pictures :

The 1st stage fungi bags , 2011-11-26


The ends of the fungi bags were dark brown

The 2nd stage fungi bags , they were full white , 2011-12-8

The right fungi lump had pale yellow wood flakes , it was suitable for rearing

Adding additives in the wood flakes (N source)

Adding additives in the wood flakes (C source)

After stirring the wood flakes , the white color had disappear  

The finished jars , 2012-2-11

The wood flakes were whitish , 2012-2-12


The wood flakes had  been covered by mycelium , 2012-2-12


2013年8月19日 星期一

Three species breeding results of the Genus Dorcus

I have ever bred three species of the Genus Dorcus .

Their scientific names are Dorcus hopei binodulosus , Dorcus grandis moriyai & Dorcus hopei hopei .

According to some researches , we all know that the vast majority of Dorcus females only oviposit in decayed wood .

So i always laid some decayed wood in the bottom of the breeding containers , whether it is vertical or horizontal , both available .

In my cases , i got bone dry decayed wood from dedicated shops .

When i was going to set up a breeding container , i picked out some decayed wood whose hardness was proper for Dorcus females to oviposit in it .

Then , i placed the decayed wood vertically in a tub which had been filled some water , then , putting stones on the top of the wood to fix them thoroughly .

If the water had been absorbed totally , i would add water in the tub until the wood was filled with water .

Before placing the wood in the tub , i had weighed the wood , then , weighing the moist wood again , through the weight comparisons , i could know the wood moisture and adjust the humidity by absorbing water or drying out .

In the wild , females of stag beetles will ingest proteins by preying other insects , in captive breeding , i employed fishmeal as the protein source , i often sprinkled fishmeal on the jelly to feed them .

Once a breeding container had been prepared , i put a fertilized female in the container about one month and kept the breeding temperature in the range of 20 - 25 degrees Celsius .

As a reminder , D. h. h. females had a good chance to hibernate when the temperature was too low , so i bred them at room temperature in the end of spring and the beginning of summer .

For me , to retrieve the L1 larvae from hard decayed wood was not a easy thing , hence , after taking the female out of the breeding container , i would wait more than one month to retrieve the larvae .

Thus , i could break open the wood and retrieve the larvae easily , because most of the eggs had hatched and formed many tunnels inside the wood .

In this way , most of the larvae were old L1 or young L2 larvae , so i could put them into the prepared kinshi bottles directly or use fermented decayed wood flakes to feed them .

A breeding container had been set up on May 10th 2010 , i laid a piece of decayed wood in the bottom of the container and used decayed wood flakes to cover the wood .   

I put a D. h. h. female into the breeding container , then , taking it out of the container on June 13th 2010 .

2010-6-21 , i seen a larva in the bottom of the container , which means that the female laid eggs immediately when she was being put into the container .

2010-7-2 , i broken open the decayed wood with bare hand , but the middle portion of the decayed wood was still hard , so i put it back , this time , i just retrieved larvae from the decayed wood flakes and the soft portion of the wood chunk .

In the second time , i found the rest ten larvae in August 2010 .

Those larvae was fed on fermented decayed wood flakes , and turned into adults in May 2011 .

I bred Dorcus hopei binodulosus and Dorcus grandis moriyai on July 20th 2011 and July 28th 2011 respectively .

The females were taken out of the containers on August 21st 2011 and August 28th 2011 respectively .

I used a piece of hard decayed wood to breed  Dorcus hopei binodulosus and retrieved L2 larvae on October 1st 2011 , i put them into the prepared kinshi bottles , finally , the adults emerged  in July 2012 .

As for Dorcus grandis moriyai , i used a piece of middle decayed wood and a piece of soft decayed wood as the oviposition medium , i retrieved L1 larvae from the wood chunks , the female was not picky about wood hardness .

After retrieving the larvae , i used the prepared kinshi bottles to rear them , eventually , the adults emerged in August 2012 . 

For the three species , each harvest could achieve up to ten plus normally ,so i had prepared sufficient jars and food before retrieving larvae .

Related pictures :


                      Many oviposition holes on the decayed wood , 2011-8-21


D. h. b. L1 larva

D. h. b. L2 larva

D. h. b. L2 larva

D. h. b. newly male adult 


D. g. m. L1 larva


D. g. m. larva in the middle decayed wood 

D. g. m. larva in the soft decayed wood


D. g. m. L3 larva (male)

D. g. m. male pupa


D. g. m. newly male adults in the artificial cells


 Kinshi bottles

Fermented decayed wood flakes

A D. h. h. larva chewed the decayed wood to form a tunnel


D.h. h. L1 larva and L2 larva


D. h. h. old L3 larva (male)


D. h. h. male pupa


D. h. h. newly male adult in the artificial cell 

D. h. h. female adult